Being Mrs. Pierce

Life as a wife, hiker, wanna-be chef, book-lover, traveler, and now, mom

Pumpkin Streusel Coffee Cake (New Recipe #103) December 23, 2013

Filed under: Cooking — skpierce12 @ 9:49 AM
Tags: , , , , ,

006


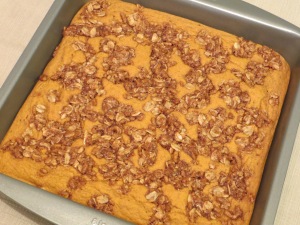
Two weekends ago DFW was hit with a winter storm that left the roads covered in ice. My school district canceled classes that Friday and Monday, so I found myself with an unexpected four-day weekend at home. In the past, I probably would have spent most of that time reading, but my inner chef is calling loud and clear these days. As a result, I fiddled the hours away each day in the kitchen. On that Saturday morning, I tried out the Hungry Girl’s Pumpkin Streusel Coffee Cake for breakfast. A well-documented fan of pumpkin, I was eager to try this light –and pumpkiny — version of coffee cake.


For the white sugar, I followed the Hungry Girl’s alternative suggestion, which calls for Splenda No Calorie Sweetener (granulated) instead of regular sugar. Using Splenda lowers the PointsPlus value of each serving from 4 to 3. While I enjoy the PointsPlus benefit of Splenda, I remain conflicted about baking with and consuming it. I am attempting to eat more natural, less processed foods, so the use of Splenda is in direct contrast with that goal. Yet six years of WeightWatchers habits are hard to break, and I want to maintain my current waistline. The final outcome of the sugar vs. Splenda war remains, therefore, TBD.


I removed the coffee cake 35 minutes after I placed it in the oven, and it passed the toothpick test. I did not feel the need to bake it any longer, even though the recipe calls for a 45-minute baking time. The breakfast treat made my house smell like fall as it cooked and cooled; it created the perfect blend of cinnamon and spice in the air. When it was finally time to try a piece, I was pleased at the taste and texture. The crumb topping is a definite plus; it added a pleasant crunch to the sweet and moist cake underneath. John and I both granted it 3 stars.


Pumpkin Streusel Coffee Cake

Crumb Topping
¼ cup Fiber One Original bran cereal
3 TB old-fashioned oats
3 TB brown sugar (not packed)
2 TB granulated white sugar (or Splenda No Calorie Sweetener, granulated)
½ tsp cinnamon
2 TB light whipped butter or light buttery spread

Cake
1 cup whole-wheat flour (I used whole-wheat pastry flour)
½ cup granulated white sugar (or Splenda No Calorie Sweetener, granulated)
¼ cup all-purpose flour
1 tsp baking powder
¾ tsp cinnamon
½ tsp baking soda
¼ tsp pumpkin pie spice
¼ tsp salt
¾ cup canned pure pumpkin
½ cup fat-free liquid egg substitute
½ cup club soda
1/3 cup low-fat buttermilk
1 tsp vanilla extract

1.  Preheat oven to 350°F. Spray an 8″ X 8″ baking pan with nonstick spray.

2.  To make the crumb topping, place cereal in a sealable plastic bag. Seal bag, and finely crush cereal with a meat mallet or other heavy utensil. Transfer crumbs to a medium bowl. Add all other topping ingredients to the bowl except butter, and mix well. Add butter, and mash and stir until uniform.

3.  To make the cake, in a large bowl, combine whole-wheat flour, sugar, all-purpose flour, baking powder, cinnamon, baking soda, pumpkin pie spice, and salt. Whisk thoroughly.

4.  In a medium-large bowl, combine pumpkin, egg substitute, club soda, buttermilk, and vanilla extract. Whisk until uniform. Add mixture to the large bowl, and whisk until uniform.

5.  Pour cake batter into the baking pan. Sprinkle with crumb topping.

6.  Bake until a toothpick inserted into the center comes out clean, about 45 minutes.

7.  Let cool for 30 minutes. Slice into squares, and eat!

Yield: 9 servings. Per serving, 4 PointsPlus (or 3 PointsPlus when using Splenda in place of granulated white sugar).
 

Southwest Meatloaf Minis (New Recipe #99) December 7, 2013

004 006


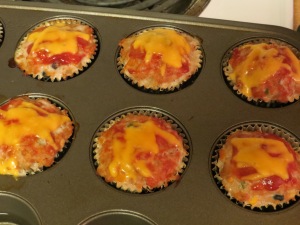
Last weekend I was in the mood for some comfort food, so I selected the Hungry Girl’s Southwest Meatloaf Minis for our Sunday night dinner. These meatloaves are a variation on the Hungry Girl’s Turkey and Veggie Meatloaf Minis, which we endearingly call “meat cupcakes” at our house. The southwest version nixes the broccoli slaw but adds black beans, corn, cheese, and a good deal of heat courtesy of the jalapeño peppers and cayenne.


I very much enjoyed the southwest meatloaf minis, but not quite as much as the original meat cupcakes. John and I gave the southwest version 3.5 stars. The meatloaves are good leftover, too. The recipe yielded 10 cupcakes, which was the perfect amount for 2 people for 2 dinners, as each night I ate 2 and John ate 3.  We did not add any of the listed optional toppings, although John did eat his meat cupcakes with a little extra ketchup.


Southwest Meatloaf Minis

½ cup diced red bell pepper
½ cup diced onion
1¼ lbs raw lean ground turkey (7% fat or less)
¾ cup canned crushed tomatoes
1/3 cup seeded and finely chopped jalapeño peppers
¼ cup quick-cooking oats
¼ cup fat-free liquid egg substitute
¼ cup frozen sweet corn kernels, thawed
¼ cup canned black beans, drained and rinsed
½ tsp salt
¼ tsp black pepper
¼ tsp cayenne pepper
3 TB ketchup
¼ cup shredded reduced-fat Mexican-blend cheese
Optional toppings: salsa, fat-free or light sour cream, hot sauce

1. Preheat oven to 350°F. Line 10 cups of a 12-cup muffin pan with foil baking cups, or spray them with nonstick spray.

2. Bring a skillet sprayed with nonstick spray to medium heat. Cook and stir bell pepper and onion until softened and lightly browned, 5 – 7 minutes.

3. Transfer cooked veggies to a large bowl. Add all remaining ingredients except ketchup and cheese. Mix thoroughly.

4. Evenly distribute mixture among the 10 lined or sprayed cups of the muffin pan. Evenly top with ketchup, about 1 tsp. each. Bake until firm and cooked through with lightly browned edges, about 35 minutes.

5. Sprinkle meatloaves with cheese. Bake until cheese has melted, about 2 minutes.

Yield: 5 servings (serving size: 2 meatloaf minis). Per serving, 6 PointsPlus.


Pumpkin Bread (New Recipe #98)

Filed under: Cooking — skpierce12 @ 6:05 PM
Tags: , , , ,

003


Without realizing it, I have apparently embarked upon a quest to make every pumpkin recipe that crosses my path. Just when I think that I have satisfied my pumpkin-baking urge for the year, I come across a new recipe and before I know it, I am in the kitchen making it. Such was the case with the Hungry Girl’s Perfect Pumpkin Bread.


For the dried fruit, I picked raisins over cranberries since I had very recently made the Cranberry Pumpkin Bars. I plumped my raisins before stirring them into the batter. The rest of the recipe I made according to the directions, although my bread needed only 40 minutes in the oven rather than 50.


Unfortunately, the Perfect Pumpkin Bread did not turn out so perfectly.  The taste of the bread was very disappointing — rather blah and barely sweet.  On the positive side, each serving of this bread was a generously-sized slice.  However, the large portion size was not enough to make up for the lack of taste; this bread earned only 2 stars.  I do not expect that I will make this recipe again.


Perfect Pumpkin Bread

1¼ cups whole-wheat flour
¼ cup all-purpose flour
½ cup Splenda No Calorie Sweetener (granulated)
¼ cup brown sugar (not packed)
2¼ tsp baking powder
1 ½ tsp cinnamon
½ tsp salt
1/3 tsp pumpkin pie spice
One 15-oz. can pure pumpkin
½ cup fat-free liquid egg substitute
1 tsp vanilla extract
¼ cup sweetened dried cranberries or raisins, chopped

1. Preheat oven to 350°F. Spray a loaf pan with nonstick spray.

2. In a large bowl, mix both types of flour, Splenda, brown sugar, baking powder, cinnamon, salt, and pumpkin pie spice.

3. In another large bowl, whisk pumpkin, egg substitute, and vanilla extract. Add this mixture to the large bowl and stir until just blended.

4. Stir in chopped cranberries or raisins. Transfer batter to the loaf pan and smooth out the surface. Bake until a toothpick inserted into the center comes out clean, about 50 minutes.

Yield: 8 servings. Per serving, 4 PointsPlus.


Caramelized Onion Fillo Bites (New Recipe #96) December 2, 2013

Filed under: Cooking — skpierce12 @ 8:47 PM
Tags: , , , ,

017


Before I settled on serving the Whole Roasted Garlic spread alongside my homemade Blooming Herb Bread as an appetizer for a small dinner party John and I hosted last month, I briefly considered making the Hungry Girl’s Caramelized Onion Fillo Bites. Never having made the appetizer recipe before, I whipped up a half-batch of the onion bites the week before the party to help me decide whether they were guest-worthy or not.


The onion bites were very easy to prepare and assemble. I had the onion caramelizing on the stove while I was in the kitchen preparing other food for that night’s dinner, so the time factor of caramelizing onion was not of particular concern.


John and I taste-tested the onion bites as an appetizer before our dinner, and we both enjoyed them. The combination of creamy cheese, sweet onion, and crunchy fillo shell was an enjoyable one. I gave the onion bites a respectable 3 stars, but I decided I would not want to serve them to guests when I was preparing just a single appetizer. I would be more likely to include the onion bites in a party menu in which multiple appetizer choices would be present.


Caramelized Onion Fillo Bites

2 cups chopped sweet onion (about 1 large onion)
1 tsp chopped garlic
1/4 tsp salt
1/8 tsp cayenne pepper
3 wedges The Laughing Cow Light Creamy Swiss cheese, room temperature
10 frozen mini fillo shells

1. Preheat oven to 375 degrees.

2. Bring a large skillet sprayed with nonstick spray to medium-high heat. Add onion, garlic, salt, and cayenne pepper. Cook and stir until slightly softened, 3 – 5 minutes.

3. Reduce heat to medium low. Stirring frequently to ensure onion doesn’t burn, cook until browned and caramelized, 20 – 25 minutes.

4. Transfer onion to a bowl. Add cheese wedges, breaking them into pieces, and stir until melted and evenly mixed.

5. Place shells on a baking sheet and evenly distribute onion mixture among them.

6. Bake until shells are lightly browned, about 8 minutes.

Yield: 2 servings (serving size: 5 fillo bites). Per serving, 5 PointsPlus.


Downside-Up Peanut Butter Dream Pie (New Recipe #93) November 30, 2013

Filed under: Cooking — skpierce12 @ 3:26 PM
Tags: , , , ,

013


Peanut butter is among the foods that I would have trouble living without. Spread on a warm, toasted English muffin, tucked inside two soft slices of bread, or featured in a delectable dessert, peanut butter works well any time of the day. The only problem (well, not a problem, per se — perhaps more of an issue) with peanut butter is its fat content and its propensity to hike up the PointsPlus value of any recipe in which it is an ingredient. So when I found the Hungry Girl’s Freezy Downside-Up PB Dream Pie recipe, I was thrilled to try a peanut butter pie that would set me back only 4 PointsPlus per serving.


One of the best parts of using peanut butter in a recipe is how yummy it smells. As soon as I began mixing the batter, I wanted to dive right in and eat it thanks to the nutty aroma wafting up from the bowl. I held back — but only for so long.  I was so eager to try the pie that I didn’t leave it in the freezer long enough for the pie to solidify all the way through, so it was a little runny the first time I served it to John and myself. The following day, however, the pie had firmed up nicely and I was able to cut it into neat and tidy triangles, as pictured above.


Whether frozen solid through or not, the pie was very tasty. It wasn’t too sweet, the amount of peanut butter flavor was just right, and the crumbled graham crackers provided a nice contrast to the cold, creamy filling. I gave it 3.5 stars.


Freezy Downside-Up PB Dream Pie

½ cup reduced-fat creamy peanut butter, room temperature
Half an 8-oz. tub fat-free cream cheese, room temperature
¼ cup powdered sugar
½ cup light vanilla soymilk (or Unsweetened Vanilla Almond Breeze)
1 cup Cool Whip Free, thawed
2 sheets (8 crackers) low-fat honey graham crackers, crushed
Optional topping: Fat Free Reddi-wip (I didn’t use this)

1. Place peanut butter and cream cheese in a large bowl. Using an electric hand mixer set to medium speed, mix until smooth and uniform.

2. Add powdered sugar to the bowl. Set the mixer to low speed, and mix well. Add soymilk and continue to mix until smooth.

3. Gently fold in whipped topping, until uniform in color.

4. Carefully transfer the filling into a pie pan. Evenly top with crushed graham crackers. Cover and freeze until firm, at least 2 hours.

5. Cut into 8 slices and, if you like, top with Reddi-wip.

Yield: 8 servings. Per serving, 4 PointsPlus.


Very Berry Dreamboat Parfaits (New Recipe #92)

Filed under: Cooking — skpierce12 @ 10:40 AM
Tags: , , ,

006


When I am strictly counting Points, sugar-free pudding is a lifesaver when my sweet tooth kicks into high gear (which is often). Smooth and creamy pudding helps soothe my craving for something sweet while being low in Points. Now that I am back to maintaining, rather than losing, weight, I have enjoyed ramping up the desserts in my life. For example, the Hungry Girl’s Very Berry Dreamboat Parfaits has pudding as its base, but also includes ingredients such as graham crackers that I would have skipped while trying to lose weight.


Not having any parfait glasses or other suitable clear serving vessels, I made the parfaits in our stemless wine glasses, which was a mistake. The mouth of each glass was too narrow, making it difficult to neatly spoon in the various layers of pudding mixture and fruit. The picture above shows this clearly. Luckily I was not serving these to company–just to John and myself for an after-dinner treat.  I used fresh raspberries only; the strawberries were past their prime when I made these parfaits earlier this fall.


The parfaits reminded me of my mother-in-law’s berry trifle recipe made with pudding mix and angel food cake (although the trifle is the superior dessert).  The pudding mixture was thicker than plain pudding thanks to the cream cheese. I left out the Reddi-wip, as I cannot bring myself to eat whipped topping from a can, but the parfaits did not need it anyway. Overall, these made for a 3 star dessert. I may or may not make them again.


Very Berry Dreamboat Parfaits

2 TB (half a 4-serving box) Jell-O Sugar Free Fat Free Vanilla Instant pudding mix
2 TB Splenda No Calorie Sweetener (granulated)
¼ tsp vanilla extract
¼ cup fat-free milk
1 cup Cool Whip Free, thawed
½ cup fat-free cream cheese, room temperature
½ cup raspberries
½ cup sliced strawberries
1 sheet (4 crackers) low-fat graham crackers, lightly crushed
Optional: Fat Free Reddi-wip

1. Combine pudding mix, sweetener, vanilla extract, and milk in a bowl. Stir vigorously, until smooth and slightly thickened. Mix in whipped topping and cream cheese. Stir thoroughly, until completely mixed and smooth. Cover and refrigerate for at least 20 minutes.

2. Evenly distribute raspberries between 2 parfait glasses (or any midsize glasses). Evenly distribute half of the chilled pudding mixture between the glasses, about ¼ cup per glass.

3. Repeat layering with strawberries and the remaining half of the pudding mixture.

4. If you like, top each parfait with a squirt of whipped topping. Evenly distribute the crushed graham crackers between the glasses.

Yield: 2 servings. Per serving, 5 PointsPlus.


Yippee Chippee Chocolate Chip Muffins (New Recipe #91) November 28, 2013

Filed under: Cooking — skpierce12 @ 7:25 PM
Tags: , , , , ,

004 005


Muffins are among my favorite baked goods to make from scratch. They are slightly sweet, warm, and fluffy as they emerge from the oven in handy, single-serve portions. Best of all, they make the house smell like a bakery. So when I come across a new muffin recipe, I am inclined to try it. Thus it was with the Hungry Girl’s Yippee Chippee Chocolate Chip Muffins.


This particular recipe drew my attention because it gave me an excuse to buy a carton of Almond Breeze unsweetened vanilla almond milk. I have seen Almond Breeze on numerous ingredients lists (most of them by Hungry Girl) and always have been intrigued. While this recipe calls for light vanilla soymilk, I substituted the Almond Breeze instead. I also used regular milk chocolate chips in place of the mini semi-sweet chocolate chips, not having any of the latter on hand.


For being a “diet” recipe, these muffins turned out surprisingly delicious. They had just the right amount of chocolate in them and were light and fluffy, just as muffins should be. They are perfect for both breakfast and a sweet bite at the end of the day. John and I gave them 4 stars, and I promptly made a second batch a couple of days after the first, as John and I gobbled them up in record time.


Yippee Chippee Chocolate Chip Muffins

1 cup whole-wheat flour
¼ cup Splenda No Calorie Sweetener (granulated)
3 TB brown sugar (not packed)
1½ tsp baking powder
¼ tsp salt
½ cup light vanilla soymilk (I used Almond Breeze unsweetened vanilla almond milk)
¼ cup sugar-free pancake syrup
¼ cup fat-free liquid egg substitute
2 TB light whipped butter or light buttery spread, room temperature
2 TB no-sugar-added applesauce
½ tsp vanilla extract
¼ cup mini semi-sweet chocolate chips (I used regular milk chocolate chips)

1. Preheat the oven to 400 degrees. Line a standard 6-cup muffin pan (or 6 cups of a 12-cup muffin pan) with foil baking cups or spray with nonstick spray.

2. In a large bowl, whisk flour, Splenda, brown sugar, baking powder, and salt.

3. In another large bowl, whisk all other ingredients except chocolate chips. Add the flour mixture and stir until smooth. Fold in chocolate chips.

4. Evenly distribute batter among the 6 lined or sprayed cups of the muffin pan. Bake until a toothpick inserted into the center of a muffin comes out clean, about 22 minutes.

Yield: 6 servings (serving size: 1 muffin). Per serving, 5 PointsPlus.


Sloppy Joe Stir-Fry Slaw (New Recipe #88) November 25, 2013

Filed under: Cooking — skpierce12 @ 7:47 AM
Tags: , , , , ,

020 ???????????????????????????????


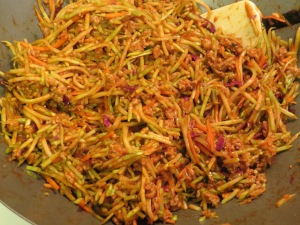
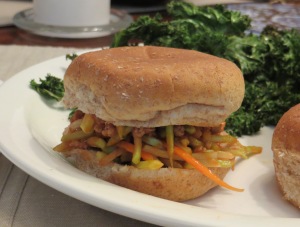
Back in September, I had to put my blog on hiatus during the back-to-school deluge of work. While I was not posting during that time, I did manage to keep cooking (for the most part), and I even tried out a number of new recipes (on the weekends). Many of the new recipes I attempted during that period were short on required ingredients and time, including the Hungry Girl’s Sloppy Joe Stir-Fry Slaw. Rereading the recipe two months later, I am a little surprised that I ever picked out this recipe to make! The word “Manwich,” if I were in a normal state of mind, would have kept me from reading any further in the recipe and certainly from actually cooking it. Yet cook it, I did.


The best part of the recipe, by far, was its quickness of preparation; the Sloppy Joe mixture was hot and ready to go within 15 minutes. I served the slaw on whole-wheat slider buns with Baked Kale Chips on the side. The recipe was not a successful one, however, as neither I nor John liked the flavor of the Sloppy Joe sauce, which unfortunately pervaded the entire dish. Even the presence of broccoli slaw, which I love, was not enough to save it.  We gave the recipe 2 stars, and I doubt I will ever make it again (unless addled by beginning-of-school-year-brain, of course).


Sloppy Joe Stir-Fry Slaw

8 oz raw lean ground turkey
One 12-oz. bag (about 4 cups) dry broccoli cole slaw
1 cup Hunt’s Manwich Original Sloppy Joe Sauce

1. Bring a skillet sprayed with nonstick spray to medium-high heat on the stove. Add turkey and use a spatula to break it up. Cook and crumble until browned and fully cooked, about 8 minutes.

2. Add slaw and sauce to the skillet and stir to mix. Continue to cook for about 6 minutes, stirring occasionally, until sauce is hot and slaw has softened.

Yield: 4 servings (serving size: about 1 cup). Per serving, 3 PointsPlus.


Baked Kale Chips (New Recipe #87)

Filed under: Cooking — skpierce12 @ 7:12 AM
Tags: , , ,

019


As a fan of kale in soups and sautéed as a vegetable side, I have been curious about the Hungry Girl’s Baked Kale Chips recipe. I enjoy crunchy sides and snacks (which explains why I nearly always have jicama sticks at the ready in my fridge), especially when they are free of Points. When I made up a batch of the Hungry Girl’s Sloppy Joe Stir-Fry Slaw earlier this fall, the baked kale chips sounded like they would make for a complementary side dish to the sandwiches.


The recipe below could not be an easier one to follow, and it was quick, to boot. The only issue I had was how long to bake the kale leaves. While some of the leaves began to brown and burn around the edges, others were still soft in the middle. Perhaps I did not cut my “chips” in similar enough sizes. Whatever the cause, I had to pull some of the leaves off the baking sheet before the others.


As for taste, the kale chips lacked anything special. The salt added some flavor, but otherwise, the chips were just okay. I gave them 2.5 stars, and I haven’t been enticed to make them again. I have not given up on the idea of turning kale leaves into crispy chips, but I will try a different recipe next time.


Baked Kale Chips

2 cups fresh kale leaves
Olive oil nonstick spray
Dash salt, or more to taste

1. Preheat oven to 425 degrees.

2. Place kale leaves on a baking sheet sprayed with olive oil nonstick spray. Spritz leaves with the nonstick spray and sprinkle with salt.

3. Bake in the oven until crispy, 5 – 8 minutes, for a potato-chip-like snack. If you like, season to taste with additional salt.

Yield: 1 serving. Per serving, 0 PointsPlus.


Pumpkin Bread Pudding (New Recipe #84) November 9, 2013

Filed under: Cooking — skpierce12 @ 12:41 PM
Tags: , , , ,

001 003


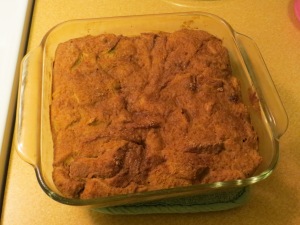
In my last post, I expounded on the joys of bread pudding.  It is no surprise, therefore, that when I received the Hungry Girl’s recent e-mail with a recipe for pumpkin bread pudding, I immediately made plans to try it.  Bread pudding AND pumpkin?  TWO of my ultimate food pleasures all in one?  I had to get to baking.


Similarly to the Hungry Girl’s breakfast bread pudding bowl, this dessert recipe is a diet one–light this, fat-free that–but it is also low Points as a result.


As the bread pudding baked in the oven, it filled the kitchen with the warm, spicy aroma that I can never get too much of in the fall. I served it warm, topped with light vanilla ice cream. I was especially glad for the ice cream upon discovering that the bread pudding itself was not very sweet. The pumpkin, however, was just right–flavorful but not overpowering.  John wondered if the bread pudding would not be a good breakfast recipe, topped with maple syrup rather than ice cream.  We never tried it, but I just may next time.  As is, the recipe earned 3 stars from John and me. With non-light bread and more sugar, the recipe would definitely earn higher stars.  Too bad that means it would have a higher Points value, too!


Perfect Pumpkin Bread Pudding

12 slices light bread
¼ cup light whipped butter or light buttery spread
1 cup canned pure pumpkin
1 cup fat-free liquid egg substitute
¾ cup light vanilla soymilk (I used unsweetened vanilla Almond Breeze)
¼ cup plus 2 TB brown sugar (not packed)
1 tsp pumpkin pie spice
1 tsp cinnamon
1/8 tsp salt

1. Preheat the oven to 350 degrees. Spray an 8″ X 8″ baking pan with nonstick spray.

2. Lightly toast bread, and cut into bite-sized pieces.

3. In a large microwave-safe bowl, microwave butter for 30 seconds, or until melted.

4. Add bread pieces to the bowl, and toss to coat.

5. In another large bowl, combine remaining ingredients except 2 TB brown sugar, and whisk until uniform. Add mixture to the bowl of buttered bread, and stir to coat.

6. Transfer mixture to the baking pan. Evenly top with remaining 2 TB brown sugar.

7. Bake until firm and set, 40 – 45 minutes. Let cool slightly, about 10 minutes.

Yield: 6 servings. Per serving, 5 PointsPlus.