Being Mrs. Pierce

Life as a wife, hiker, wanna-be chef, book-lover, traveler, and now, mom

Slow Cooker Beef Marsala Stew with Fluffy Mashed Potatoes February 5, 2015

Filed under: Cooking — skpierce12 @ 8:00 PM
Tags: , , , ,

006


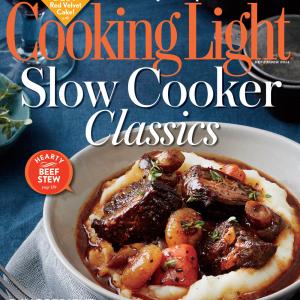
On the last day of January, I made the final slow cooker recipe for my January 2015 Cooking Challenge: Beef Marsala Stew. The recipe came from the December 2014 edition of Cooking Light, which had granted the stew front-cover status:
1412-december-2014-cover


My mom gifted me a subscription to Cooking Light last year, and I’ve loved getting my monthly delivery in the mail. Browsing online for new recipes is fun and convenient, but I still find turning the pages of paper-based magazines and cookbooks preferable.  What can I say?  I’m wired for the last century, not this one.


I normally would have bypassed this recipe, as it requires additional cooking on the stove both before and after the stew simmers in the slow cooker. But I suspected that my husband would love it, and frankly, it looked darn delicious in that cover shot.


The recipe calls for cipollini onions, which were not to be found in any of my nearby grocery stores, so I subbed a 14-oz bag of frozen peeled pearl onions instead. The only other change I made to the recipe was at the end when it says to boil the cooking liquid for 6 minutes until it reduces to 2 cups. I only had about 1.5 cups of cooking liquid left after I strained the stew, so I just brought it to a boil and immediately added the wine-flour “slurry.” I am not sure why I ended up with so little cooking liquid; perhaps I let the wine-broth mixture cook down too far in the beginning stages of the recipe. At any rate, the paucity of liquid did not affect the final result of the stew, which was fantastic. Here is the final, thick-and-hearty result in the Dutch oven just prior to serving:


003


Cooking Light suggested serving the stew atop Fluffy Mashed Potatoes, so I whisked up a batch to serve as the “bed” for the stew. This was the only weak part of the meal. The potatoes were fine–but nothing spectacular–on their own. I liked how they let the stew shine when eaten together, but I will try another mashed potato recipe next time I make this stew. And make it again I shall. This beef stew was worth the time and hassle of its preparation, earning 4.5 stars from my husband and me. It was a last-minute entry, but it won the race. Beef Marsala Stew beat out the slow cooker competition to be my highest-rated slow cooker recipe for the month of January!


Better Blueberry Muffins April 13, 2014

Filed under: Cooking — skpierce12 @ 5:14 PM
Tags: , , , , , ,

004


Between the rising temperatures outside and the end-of-school-year discussions inside, my mind has already been jumping ahead to summer. Last weekend I woke up in a baking mood, but the only treats I really wanted to make were Ellie Krieger’s summer-y Better Blueberry Muffins. I first made these muffins last August when fresh blueberries were at their peak; the delightful lemon-blueberry flavor of the muffins immediately won me over. Because it is too early for fresh blueberries to be in season, I whipped up this Comfort Food Fix recipe using frozen blueberries instead. I typically am not a fan of frozen blueberries in baked goods because everything they touch turns dark purple. And indeed, the frozen blueberries “dirtied” up the muffin batter, even when I slowly folded them in.


I was surprised when my batter yielded 18 muffins rather than 12, as both times I made these muffins last August I got the typical 12 muffins from each batch. The difference may have come from the fact that my muffin tin liners that I had in stock last August were slightly larger than standard muffin liners, which is what I used this time. At any rate, I didn’t mind the extra muffins too much, especially as making 18 muffins dropped the PointsPlus value of each one from 5 to 4.


Upon tasting the muffins, I still found them light, yummy, and yes, summer-y. The lemon flavor did not shine through as much as I remembered, despite using 2 full teaspoons of lemon zest, but the lemon was definitely discernible and I would still rate them 4.5 stars. I do prefer the muffins with fresh blueberries over frozen ones, so I plan to wait until blueberries overrun the produce stands before I make my next round of these muffins.


Comfort Food Fix recipes made: 21
Comfort Food Fix recipes still to make: 132


Better Blueberry Muffins

Nonstick cooking spray
1 cup all-purpose flour
1 cup whole-grain pastry flour or whole-wheat flour
2 teaspoons baking powder
¼ teaspoon baking soda
½ teaspoon salt
¾ cup sugar
¼ cup canola oil
2 large eggs
1 cup natural unsweetened applesauce
½ cup plain low-fat yogurt
¼ cup nonfat milk
1 teaspoon vanilla extract
1½ teaspoons finely grated lemon zest
1½ cups fresh or frozen (unsweetened and unthawed) blueberries

1.  Preheat the oven to 400 degrees. Coat a 12-cup muffin pan with cooking spray.

2.  In a medium bowl, whisk together the flours, baking powder, baking soda, and salt.

3.  In a large bowl, beat together the sugar, oil, and eggs, until the mixture is light yellow and slightly frothy. Whisk in the applesauce, yogurt, milk, vanilla, and lemon zest. Stir the dry ingredients into the wet, mixing just enough to combine them. Do not overmix. Gently stir in the blueberries.

4. Pour the batter into the prepared muffin pan. Tap the pan on the counter a few times to remove any air bubbles. Bake until a wooden toothpick inserted into the center of one of the muffins comes out clean, about 20 minutes.

5. Allow to cool on a wire rack for 15 minutes. Run a knife around them to loosen and unmold. Enjoy warm or let cool completely before storing in an airtight container in the refrigerator for up to 3 days or wrap individually and freeze for up to 3 months.

Yield: 12 servings (serving size: 1 muffin). Per serving, 5 PointsPlus.


Corn Bread with Sweet Corn Kernels February 22, 2014

Filed under: Cooking — skpierce12 @ 10:55 AM
Tags: , , , , , ,

003


During my initial perusal of Ellie’s Krieger’s Comfort Food Fix cookbook, I was excited to find a recipe for corn bread among its pages. Corn bread is one of my favorite side dishes, especially when it’s slightly sweet and still warm from the oven. For several years now, Eating Well’s Wholesome Cornbread has been my go-to corn bread recipe. I was eager to try Ellie’s recipe, however, due to its inclusion of whole corn kernels in the ingredients.


I made a double batch of the recipe two weekends ago when my in-laws were in town. For dinner that Saturday night, I served ham, baked sweet potatoes with warm black bean salad (sounds odd, I know, but they are rather amazing), Brussels sprouts, and Ellie’s Corn Bread with Sweet Corn Kernels. To make the corn bread, I used whole-wheat pastry flour and baby yellow & white corn kernels, both of which I already had on hand. Then I simply divided the doubled batch between two loaf pans and baked as directed.


We all loved the corn bread, and between five adults and two toddlers, most of one entire loaf was gone by the end of the dinner. The corn bread was slightly sweet thanks to the honey and wonderfully moist thanks to the buttermilk and bit of canola oil. The corn kernels were a nice touch both in looks and taste. This cornbread easily earned 4.5 stars! I now have a second solid corn bread recipe in my repertoire.


Comfort Food Fix recipes made: 13
Comfort Food Fix recipes still to make: 140


Corn Bread with Sweet Corn Kernels

Nonstick cooking spray
½ cup all-purpose flour
½ cup whole-wheat pastry flour or whole-wheat flour
1 cup yellow cornmeal
1½ tsp baking powder
¾ tsp salt
1 large egg
1 large egg white
1¼ cups low-fat buttermilk
3 TB honey
3 TB canola oil
1 cup fresh or frozen (thawed) corn kernels

1. Move the oven rack to the center of the oven and preheat to 350°F. Lightly spray a 9×5-inch loaf pan with cooking spray.

2. In a large bowl, whisk together the flours, cornmeal, baking powder, and salt. In another large bowl, whisk together the egg, egg white, buttermilk, honey, and oil. Add the wet ingredients to the dry ingredients, mixing just enough to combine them. Stir in the corn.

3. Pour the batter into the prepared pan. Bake until the top is golden brown and a wooden skewer inserted into the center comes out with crumbs, about 45 minutes. Allow to cool in the pan for 15 minutes, then transfer the bread to a wire rack to cool completely before slicing.

Yield: 8 servings (serving size: one 1-inch-thick slice). Per serving, 6 PointsPlus. [If loaf is divided into 10 slices, each serving is 5 PointsPlus; if 12 slices, each serving is 4 PointsPlus.]


Chai Tea Eggnog Cookies January 20, 2014

Filed under: Cooking — skpierce12 @ 7:24 PM
Tags: , , , , , ,

002


One of the many pleasures of visiting my in-laws is having unlimited access to the endless supply of cookbooks and cooking magazines that my mother-in-law Loveta has collected. Over the Christmas break, I became slightly obsessed with her copies of Southern Living. I recently discovered that my mom’s buttermilk biscuit recipe came not from my grandmother’s family, as I had long thought, but from one of my grandmother’s Southern Living magazines. If Southern Living could provide a recipe that had my husband waxing rhapsodic about biscuits for days, then what else might I discover amongst its pages?


With the holidays in full force, I pored over the special “Best Holiday Desserts” edition of the magazine from a few years back. Loveta served the Caramel Italian Creme Cake from that edition with our Christmas feast, and it was a work of art in both taste and looks. I earmarked enough recipes from that magazine alone to last me through the next ten years of holiday baking.


After a week in Menard, John and I returned home stuffed beyond reason. Yet upon opening our refrigerator at home, I spied a bottle of eggnog and immediately made plans to make up a batch of the Chai Tea Eggnog Cookies that had caught my eye in “Best Holiday Desserts.” Despite it being January 1, my holiday baking apparently wasn’t over.


I initially planned to send the bulk of the cookies with John to work for his UIL kiddos. Inspired by Loveta, who regularly bakes for a group of Junior Gardeners in Menard, last fall I began to make up a weekly batch of treats for John’s academic UIL students that he coaches and mentors. Sadly, John and I were greedy and gobbled up the majority of the first batch of cookies. They were that good. 4.5 star good. The eggnog flavor was just enough to be noticeable but not so much as to be overwhelming. The chai tea leaves added warmth and spice, and the icing on top elevated the cookies up a notch into Wow territory (icing makes everything better, doesn’t it?).


After we inhaled the first batch of cookies, I had to make a second round for his students, which I did last week. This next time around, I made up 1½ batches of icing. I love icing, and I like to be generous with it when topping baked goods. I had to stretch the single batch to cover all of the cookies on the first go-round, so I found the 1½ amount to be just right.


Chai Tea Eggnog Cookies

1 chai tea bag (I used Tazo Chai Organic Black Tea)
1 (17.5-oz) package sugar cookie mix (I used Betty Crocker Sugar Cookie Mix)
½ cup melted butter
1 large egg
4 TB eggnog, divided (I used Promised Land Old-Fashioned Egg Nog)
Parchment paper
Cinnamon sugar
1 cup powdered sugar
½ tsp freshly grated nutmeg

1. Preheat oven to 350°F.

2. Remove tea leaves from tea bag; discard bag. Stir together tea leaves, cookie mix, butter, egg, and 2 TB eggnog until well blended.

3. Drop dough by tablespoonfuls onto parchment paper-lined baking sheets. Flatten dough slightly with bottom of a glass dipped in cinnamon sugar.

4. Bake at 350°F for 8-10 minutes or until lightly browned. Transfer to a wire rack, and cool completely (about 10 minutes).

5. Whisk together powdered sugar, nutmeg, and remaining 2 TB eggnog until smooth. Spoon over cooled cookies.

Yield: about 2 dozen cookies


Honey Wheat Bread (New Recipe #101) December 9, 2013

Filed under: Cooking — skpierce12 @ 6:51 PM
Tags: , ,

002


One day last June, my sister-in-law Kalyn introduced me to the world of baking homemade bread. I drove up and spent the day with her in Ardmore, Oklahoma where she lives. In between playing with Shepherd and Lydia, her two little ones, she taught me how to bake bread from scratch. One of the breads we made that day was this Honey Wheat Bread recipe from Tasty Kitchen. It’s her go-to daily bread for sandwiches, toast — you name it. I loved the bread, but life got busy and my bread-making aspirations were set aside for a few months.


Cue DFW Ice Storm 2013. With school canceled on Friday and the weather outside truly frightful, what’s a girl to do except get in the kitchen and bake? I happily tied on my apron and got to work. This honey wheat bread would be the first of seven new recipes that I would make over the long, icy weekend.


I worried slightly about the dough rising due to the chilly temperatures, but I was patient and gave the dough plenty of extra time. In the end, I need not have worried.


I would not know it until I cut into the bread later that night, but I did make one small error as I prepped the dough. I did not punch down/roll the dough enough while preparing it for the second rise, and air pockets formed in the center of the dough as a result. While the bread was still certainly edible, it made for slightly messy sandwiches at lunch the next day.


I also removed the bread from the oven at the 20-minute mark, as my oven often cooks food quickly, which I wish I had not done. The loaves sounded hollow at that point, but they really could have used a few more minutes.


Despite these slight glitches, the honey wheat bread still tasted fabulous and earned 4.5 stars. Homemade bread is by far tastier — and healthier — than a store-bought loaf of sliced bread. I know there will be many times in the months to come when I have to reach for those store-bought loaves, but I aim to decrease those times until they are all but nonexistent!


Honey Wheat Bread

2¼ tsp active dry yeast
1 tsp sugar
¾ cups warm water, divided
1½ cup 2% milk
¼ cups butter, melted, plus more for brushing on baked loaves
⅓ cups honey
2 tsp salt
2 cups whole wheat flour
3 cups bread flour

1. Bloom yeast in sugar and ½ cup warm water. In a stand mixer, combine milk, remaining ¼ cup water, melted butter, honey, salt and whole wheat flour. Add yeast mixture, mix just till combined and allow to sit 15 minutes.

2. Add bread flour and once dough is combined, using a dough hook, mix 6 minutes (or 10 minutes if kneading by hand) until dough forms a smooth ball.

3. Place dough in a greased bowl covered with plastic wrap. Let rise until nearly doubled in size. (Depending upon the time of year, it can take anywhere from 45-75 minutes.)

4. Punch down dough and divide dough in 2 pieces.

5. Roll each piece of dough into a 9-inch wide rectangle, then roll rectangles into loaves. Place loaves in buttered bread loaf pans. Spray tops of loaves generously with cooking spray, cover loosely with plastic wrap (they will expand beyond the height of the pan), and let rise until nearly doubled in size. This can take 30-60 minutes.

6. Preheat oven to 375°F and bake uncovered for 25-35 minutes until tops are deep golden brown. They should sound hollow when tapped.

7. Butter tops of bread loaves after removing from oven. Cool before slicing.

Yield: 2 loaves.

When each loaf is sliced into 18-20 pieces, one slice of bread equals 2 PointsPlus. When each loaf is sliced into 14-16 pieces, one slice equals 3 PointsPlus.


Oatmeal Chocolate Chip Muffins (New Recipe #72) August 15, 2013

010


My sister-in-law, Kalyn, made these muffins for John and me on a visit to Ardmore a few months back. She had found the recipe on the Tasty Kitchen website, and she and her family had grown to love the muffins. John and I did, too. I had assumed that the muffins would not be Points-friendly, but I was pleasantly surprised to discover that a muffin with chocolate chips could also be healthy. Ever since then, I have been wanting to make up a batch of my own.  This week, in which I’m trying to stock up my freezer with homemade goodies before the back-to-school rush begins, was the perfect time to try out this muffin recipe.


I did make one alteration to the original recipe in the interest of lowering Points. The original recipe calls for one full cup of chocolate chips, but I reduced that to ½ cup and thereby saved one Point per muffin. The ½ cup of chocolate chips was still more than enough to imbue each bite with chocolate-y goodness. These muffins are fantastic and earned a high, 4.5-star rating from the Pierces.


Oatmeal Chocolate Chip Muffins

1 cup old-fashioned oats
1 cup low-fat milk, divided use
1 whole egg
⅓ cups packed brown sugar
¼ cups unsweetened applesauce
2 tsp vanilla
½ cups whole wheat flour
½ cups all-purpose flour
¼ cups flax meal
1 teaspoon baking soda
½ teaspoons salt
1 teaspoon cinnamon
½ cup milk chocolate chips

1. Preheat oven to 350°F. Line a 12-cup muffin tin with liners or spray with nonstick spray. Set aside.

2. In a small bowl, combine 1 cup oats, and ½ cup of milk. Let the oats soak for 5 to 10 minutes.

3. In a large bowl, whisk together the egg and brown sugar until smooth. Add applesauce and vanilla, mixing well. Mix in flours, soaked oats, flax meal, baking soda, salt and cinnamon. Add the remaining ½ cup milk. Fold in chocolate chips.

4. Fill muffin cups with batter. Bake for 15-18 minutes, until a tester comes out clean. Best served warm.

5. Store in an airtight container. Can easily be frozen.

Yield: 12 servings. Per serving, 4 PointsPlus.